Apr 16, 2012

How to use texture effects to create beautiful compositions in Photoshop CS5


This tutorial is an example of how a few simple techniques can be used to create basics photo illustration using multiple layers, masking, the Pen tool, some basic lighting and one simple texture.

Final Image Preview

How to use texture effects to create beautiful compositions in Photoshop CS5
Start working by creating a new document (Ctrl+N) in Adobe Photoshop with the size 1280px by 1024px (RGBcolor mode) at a resolution of 72 pixels/inch.
Find a grunge texture, I used this texture from deviantart. I would like to thank the author of this photo, or if you prefer, you can substitute similar image of your own.
Download the next demonstrated texture and insert it on a new layer in our main document.
How to use texture effects to create beautiful compositions in Photoshop CS5
Create a new layer and select the Soft Round brush of black color ( set Opacity to 20% in Options bar).
How to use texture effects to create beautiful compositions in Photoshop CS5
Use this brush to dark out the left lowest corner of our canvas.
How to use texture effects to create beautiful compositions in Photoshop CS5
Set Fill to 73% for this layer and change the Blending mode to Linear Light.

How to use texture effects to create beautiful compositions in Photoshop CS5

Find a stock photo with a cool looking dancer represented on it, I used this photo from Shutterstock. I would like to thank the author of this photo, or if you prefer, you can substitute similar image of your own.
How to use texture effects to create beautiful compositions in Photoshop CS5

Remove the background using your favorite tools like Pen Tool (P)Magic Wand Tool (W)Magnetic Lasso (L) or even a simple Filter>Extract and insert it on a new layer in our main document. Apply Edit > Transform > Flip Horizontal.
How to use texture effects to create beautiful compositions in Photoshop CS5

Click on Add a layer style icon from bottom part of the Layers panel and select Drop Shadow.
How to use texture effects to create beautiful compositions in Photoshop CS5
We’ve got the next result:
How to use texture effects to create beautiful compositions in Photoshop CS5
Choose the Pen Tool (P), set the drawing mode on Shape Layers in Options bar and draw the next shape as shown. The Foreground color is #28204F. Place the layer under the dancer’s layer:
How to use texture effects to create beautiful compositions in Photoshop CS5
Set Fill to 70% for this layer and change the Blending mode to Hard Light.
How to use texture effects to create beautiful compositions in Photoshop CS5
Insert the mask on the layer by choosing Add layer mask on the bottom part of the Layers panel and choose the Soft Round brush of black color (set Opacity to 20% in Options bar).
How to use texture effects to create beautiful compositions in Photoshop CS5
Paint in the mask using this brush to hide the top part of the shape.
How to use texture effects to create beautiful compositions in Photoshop CS5
Choose the Pen Tool (P), set the drawing mode on Shape Layers in Options bar and draw the next shape as shown. The Foreground color is #FF441F. Place this layer under the layer with the dancer on it.
How to use texture effects to create beautiful compositions in Photoshop CS5
Set Fill to 57% for this layer and change the Blending mode to Multiply.
How to use texture effects to create beautiful compositions in Photoshop CS5
Insert the mask on the layer the same way we did before (Add layer mask). Choose the Soft Round brush ofblack color, mentioned in the previous example for the rhombus to hide the next zone on the shape.
How to use texture effects to create beautiful compositions in Photoshop CS5

Use the Pen Tool (P) to represent the next shape of the color #FF1F1F. Place the layer under the dancer’s layer.
How to use texture effects to create beautiful compositions in Photoshop CS5

Set Fill to 57% for this layer and change the Blending mode to Linear Burn.
How to use texture effects to create beautiful compositions in Photoshop CS5
Take now the Line Tool (U) set Weight to 1px in Options bar and draw many white lines. This layer will be situated also lower than the dancer’s layer.
How to use texture effects to create beautiful compositions in Photoshop CS5

Set Fill to 70% for all the layers containing the white lines.
How to use texture effects to create beautiful compositions in Photoshop CS5
Now we have to download the next set of patterns, named techie. Copy the pattern file to C:\Program Files\Adobe\Adobe Photoshop X\Presets\Patterns folder (Adobe Photoshop X been your version of Photoshop).
Using the Pen Tool (P), we’ll represent the next shape which layer will be situated under the dancer’s layer.
How to use texture effects to create beautiful compositions in Photoshop CS5
Set Fill to 0% for this layer. Click on Add a layer style icon from bottom part of the Layers panel and selectColor Overlay.
How to use texture effects to create beautiful compositions in Photoshop CS5
Add Pattern Overlay. Click the Pattern Preset Picker and Load the downloaded pattern file from Program Files\Adobe\Adobe Photoshop X\Presets\Patterns folder. Apply the next settings for Pattern Overlay:
How to use texture effects to create beautiful compositions in Photoshop CS5
We’ve got the next result:
How to use texture effects to create beautiful compositions in Photoshop CS5
Create a new layer and select for it the Soft Round brush (Opacity – 20%).
How to use texture effects to create beautiful compositions in Photoshop CS5

Use this brush to paint the canvas with #ED2000 color. Place this layer under the dancer’s layer too.
How to use texture effects to create beautiful compositions in Photoshop CS5


Create a Spectacular Flaming Meteor Effect on Text

Step 1

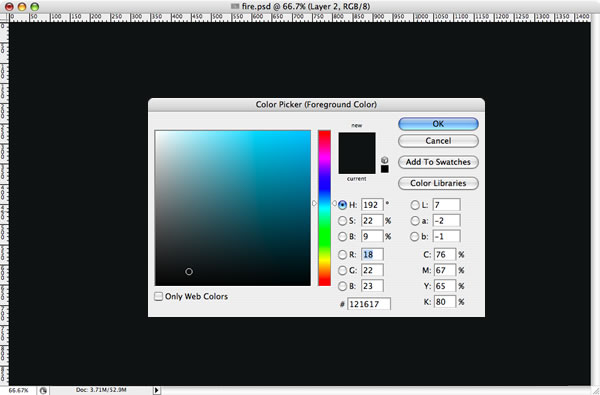
First create a new document and fill it with a dark grey.
Step 2

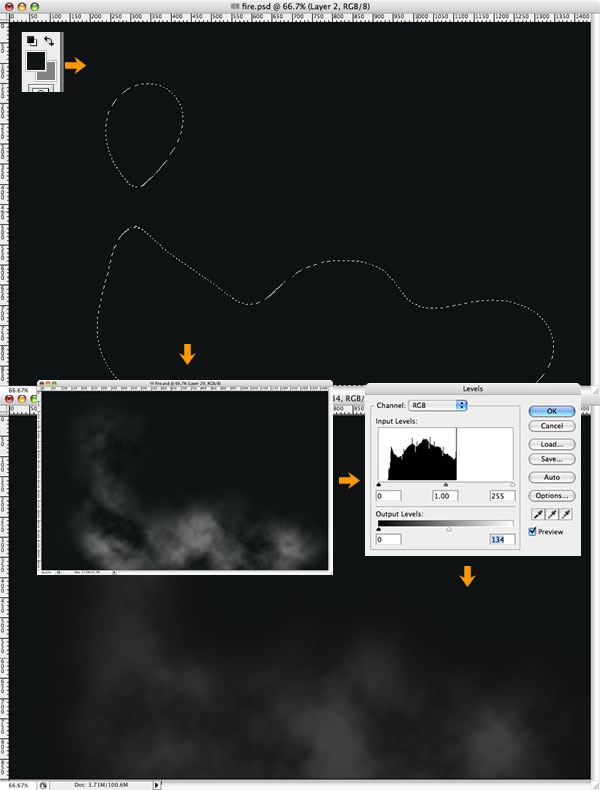
Create a new layer, call it “Clouds,” and using the Lasso Tool (L), make a selection similar to the one I’ve shown below.
Set your background color to a 50% grey and the foreground to a dark grey. Go to Filter > Render > Clouds and, holding the Alt key, create clouds. After that go to Images > Adjustments > Levels, and change the input levels and output levels until you make the clouds neither too dark nor too light (see the image shown).
This layer will be on top of the others.

Step 3

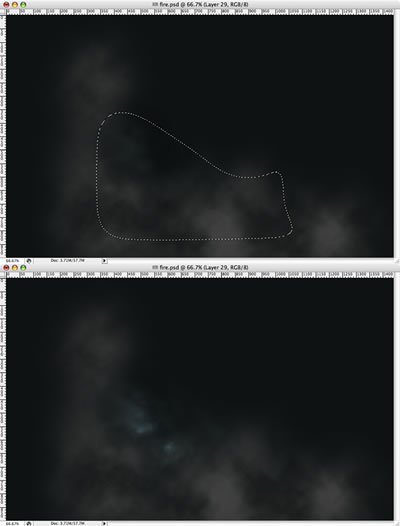
Create another layer and repeat Step 2, but this time just change the background color from 50% gray to a blue or green color. This will create a small cloud, lighter than the big one.

Step 4

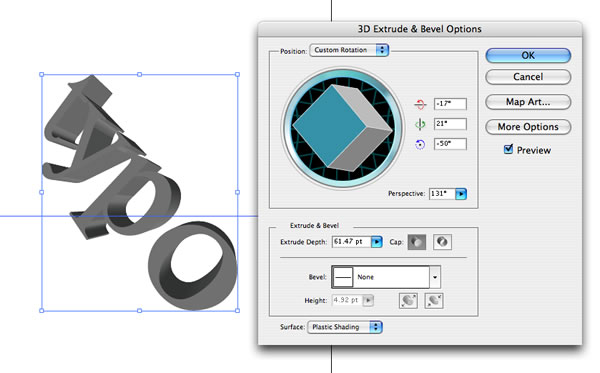
Now we’ll switch to Adobe Illustrator to create some text. I used Times New Roman for the font. After that go to Effect > 3D > Extrude and Bevel. Now we will create the 3D text. Rotate the object and change the perspective. You can use the same values as I did (shown below).

Step 5

  1. Copy the 3D text and paste it in Photoshop.
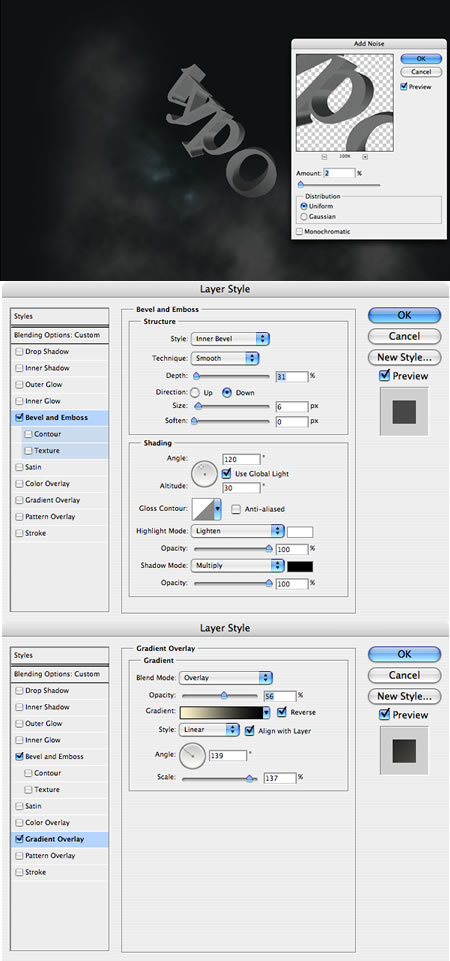
  2. Place it in the center and add some Noise (Filter > Noise > Add Noise).
  3. Now let’s change the Layer Style. First add Bevel and Emboss.
  4. After that, let’s add a Gradient Overlay.

Step 6

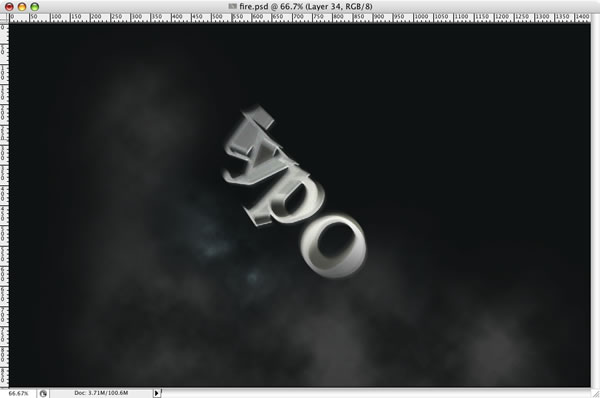
  1. Duplicate the Type layer and add a Motion Blur (Filter > Blur > Motion Blur).
  2. Set the angle of the blur to -53.
  3. Change the layer mode to Linear Dodge (Add).
  4. Create a Folder, call it “Typo,” and move these two layers into it.

Step 7

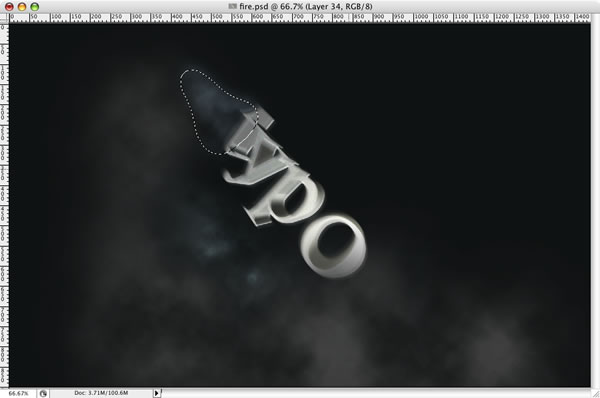
Create a new layer and repeat the Step 2, this time using a selection as shown going out the back of the letter T. This will create the trailing smoke.

Step 8 Creating the FIRE

1 – Create a new layer and call it “fire1.”
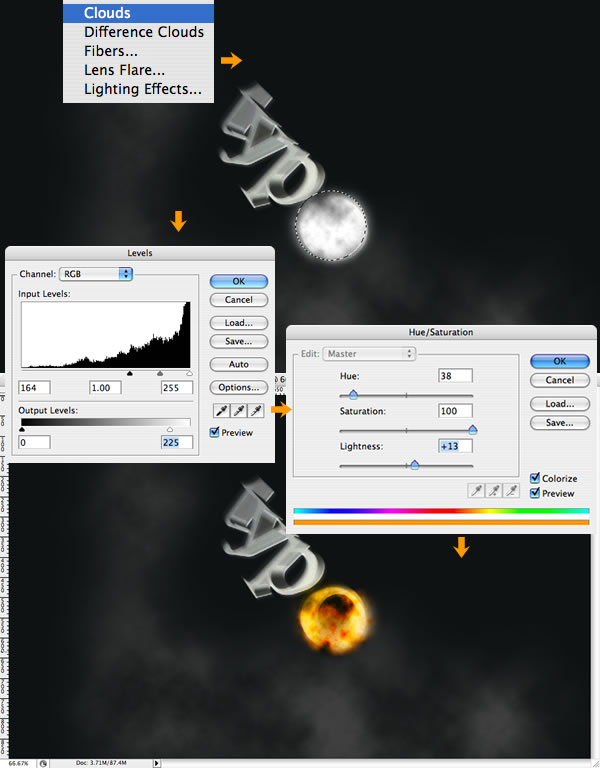
2 – With the Elliptical Marquee Tool (M), create a selection.
3 – Set the background color to light grey and the background to black.
4 – Create clouds as we did in Step 2.
5 – Change the Levels to increase the contrast;
6 – Change the Hue/Saturation with Colorize selected until you get an orange/yellow color.

Step 9

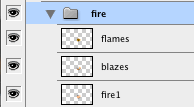
Create a new layer, call it “blazes,” and repeat Step 8. After that, duplicate the layer and call it “flames.” Create a folder and move the Fire1, Blazes, and Flames layers to this folder and call the whole folder “Fire.” It will be on top of the Typo layer.

Step 10

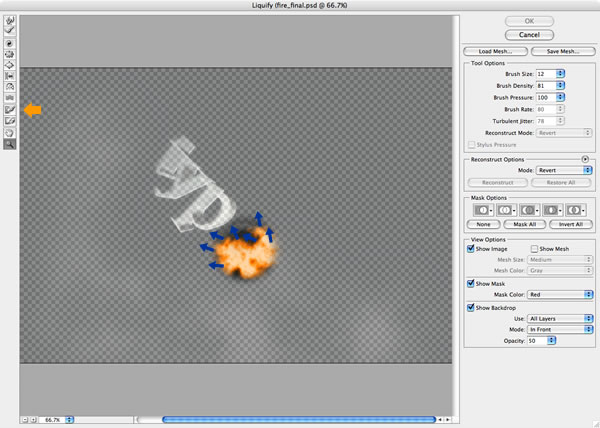
Select the layer “blazes” and go to Filter > Liquefy. There select the Turbulence Tool (T). Now, on the edges of the fire, start creating some blazes. Use it like you would the smudge tool.

Step 11

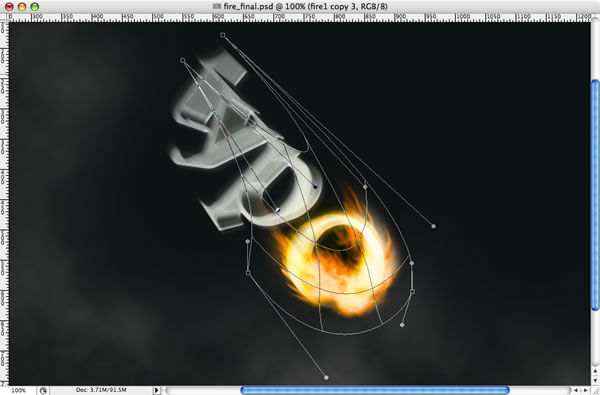
After the Liquefy, go to Edit > Transform > Warp and change the blaze’s form to something similar to the image below. After that apply Filter > Sharpen > Sharp.

Step 12

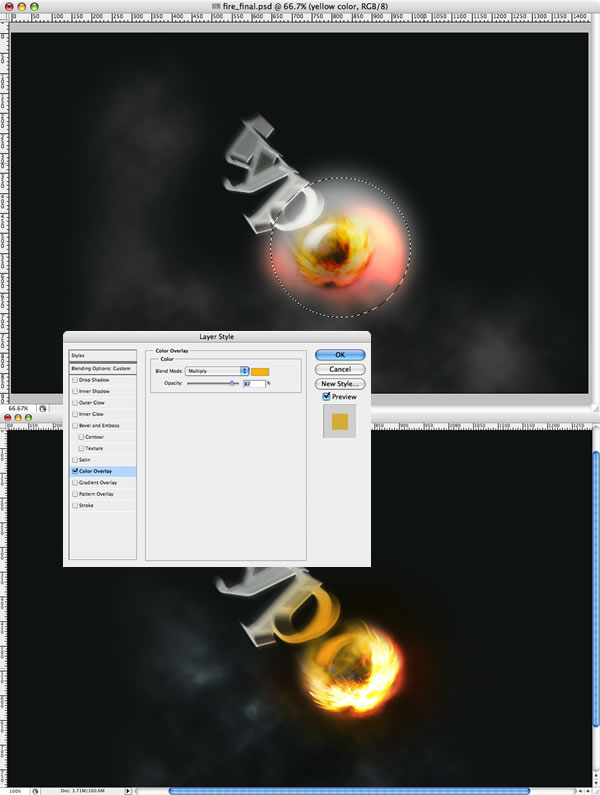
  1. Create a new layer and call it “yellow color.”
  2. Create an ellipse selection with 30px feather and fill it with white.
  3. After that edit the Layer Style and apply a Color Overlay using an yellow color and Multiply for the layer’s blend mode.


Step 13

The order and the Blend modes for the fire are:
  1. Flames: Lighter Color
  2. Blazes: Normal
  3. Fire1: Lighten
  4. Yellow Color: Multiply

Step 14 Sparks

For the sparks we will use brushes. Create a folder and call it “Sparks.” It will be on top of the Fire folder.
  1. Inside the folder, add a new layer.
  2. Fill it with black and change the Blend Mode to Color Dodge.
  3. Select the Brush Tool and let’s create a brush.
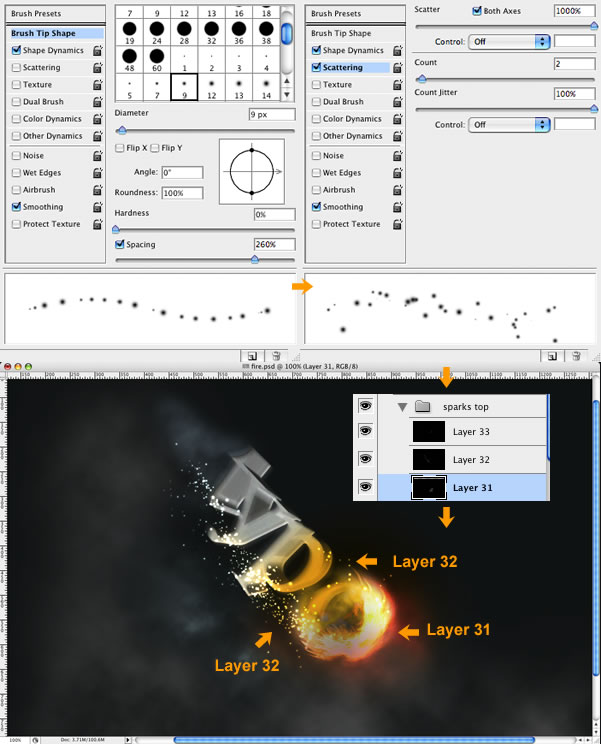
  4. In Brush Tip Shape, change the Diameter to 12, and increase the spacing.
  5. Select Scattering and set Scatter to the 1000% and Control to off. Change the Count to 2 and Count Jitter to 100%.
  6. Select white and start painting some sparks.

Step 15

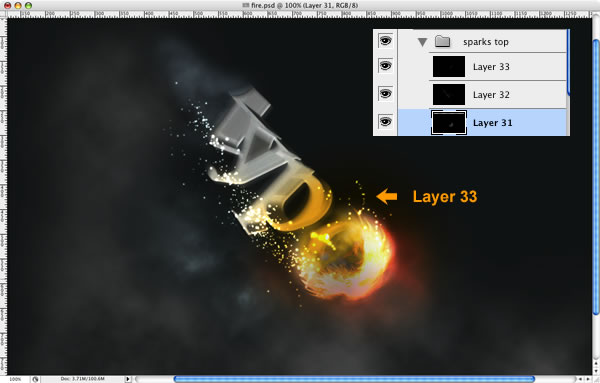
Create a new layer and repeat the Step 14 but now change the Scatter Option to 0%. Start creating some single line sparks like swirls.

Step 16

Here I used the Gomedia Spraypaint brushes to create those tiny little sparks, but you can repeat the step 14 changing the Brush size only. Basically, create a new layer, put it behind the others, fill it with black, change the Blend Mode to Color Dodge, see the color to white, and create the sparks.


Conclusion


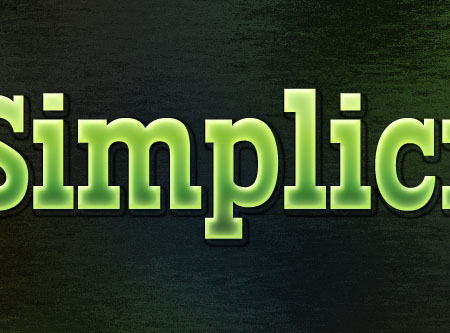
Textured Text Effect

The Final Result:


Resources:
Step 1:
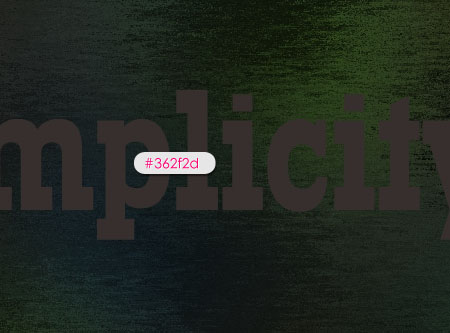
Fill the Background with the color #363636, then type the text you want, I’m using the font “Rockwell Condensed”, size (200 px), and the color #362f2d.

Step 2:
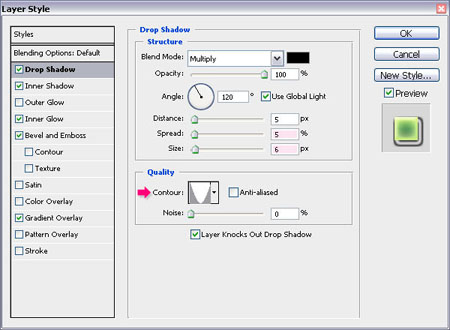
Double click on the “Simplicity” text layer, and fill in the values for the following effects:
- Apply a “Drop Shadow” with a “Spread” value of (5) and a “Size” of (6). Change the “Contour” type to “Cone – Inverted”.

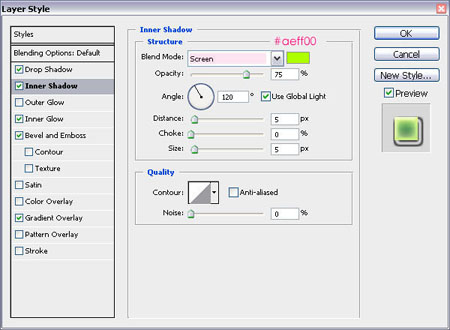
- For the “Inner Shadow”, change the “Blend Mode” to “Screen”, and the color to #aeff00.

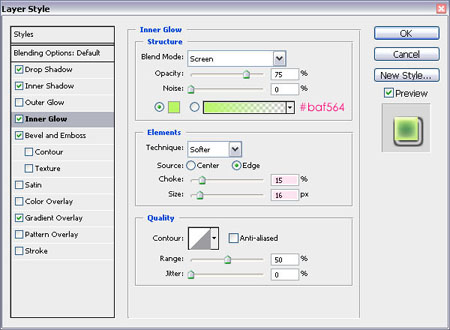
- Apply the “Inner Glow” Effect using the color #baf564, and change the “Choke” value to (15), and the “Size” to (16).

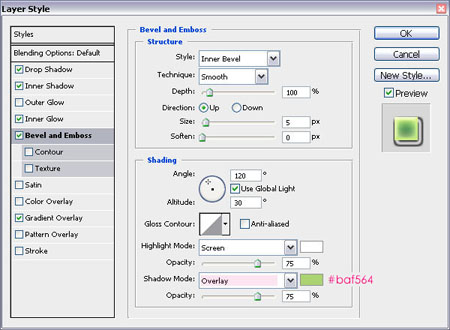
- Add “Bevel and Emboss”, change the “Shadow Mode” to “Overlay”, and the color to #acd373.

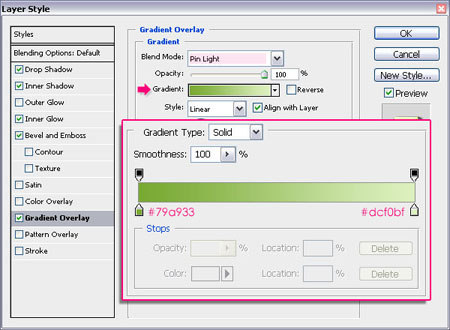
- And finally, add a “Gradient Overlay”, using the Palette provided in the Resources section at the beginning of this tutorial, or simply create the gradient using the colors #79a933 and #dcf0bf.
Click “OK” to go back to your layer.
Step 3:
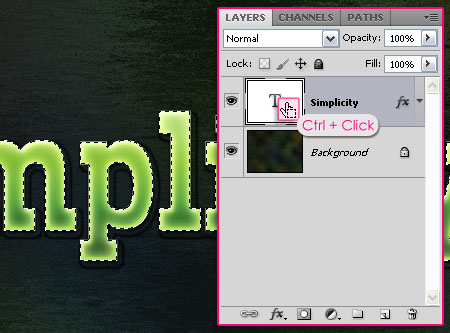
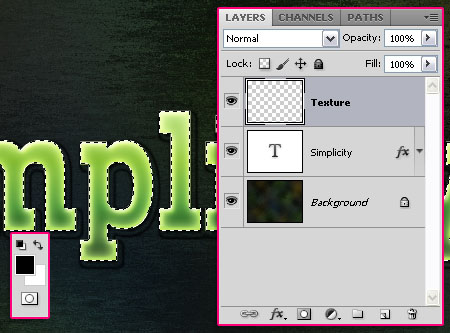
Press the Ctrl key, and click on the “Simplicity” text layer icon to create a selection. Create a new layer ABOVE the text layer and call it “simplicity-2″.
Step 4:
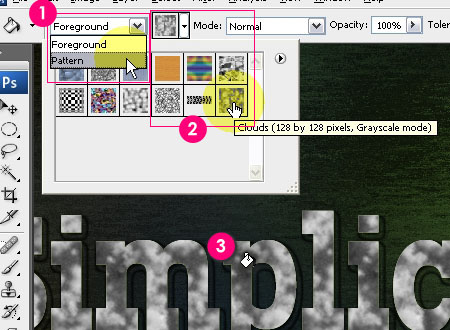
Select the “Paint Bucket Tool”, and change the fill type to “Pattern”. Choose the “Clouds” pattern, and fill the selection (make sure you are on layer “simplicity-2″).
Step 5:
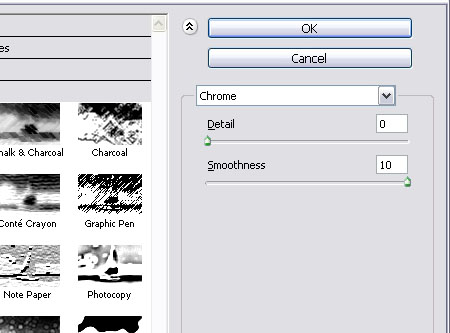
Go to the “Filter” menu -> Sketch -> Chrome. Type (0) for “Detail” value, and (10) for “Smoothness” value.

Step 6:
Again, go to the “Filter” menu -> Sketch -> Halftone Pattern. Type (1) for the “Size” value, (5) for “Contrast”, and make sure the “Pattern Type” is “Dot”.
Step 7:
Finally, change the “simplicity-2″ layer “Blend Mode” to “Overlay”, and the “Opacity” to (45%), or whatever you think looks good.
DoNe!!!!!!


Final result:


Apr 8, 2012

L.A Noire Neon Style in Photoshop

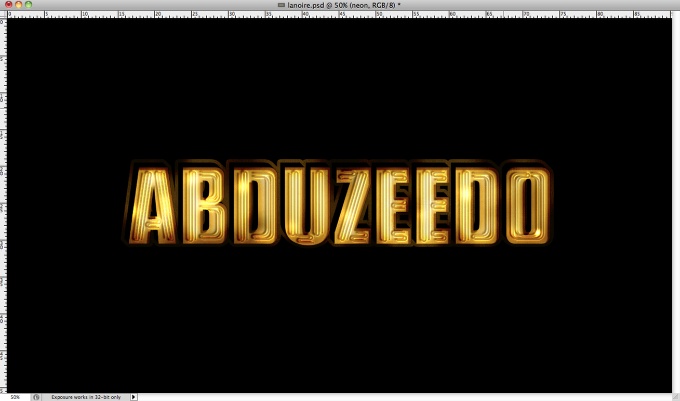
A few months ago I started seeing some poster in San Francisco about this game called L.A Noire. The text effect was really cool, sort of old style neon effect. I know I have done a few tutorials showing how to create this type of effect, but I needed to do that again in Photoshop.

So in this tutorial I will show you how to create the text effect like you see in the L.A Noire game cover. The whole tutorial will take about 1-1:30h. It's a bit tricky but it's not easy and the outcome is really cool.

Step 1

The first thing to do is create the text you will use for the background of the neon. I used Illustrator for this part because it's easier to play with fonts. So basically I am using Arial Black for the font, however I changed the B, D and O so they are not so rounded.

Step 2

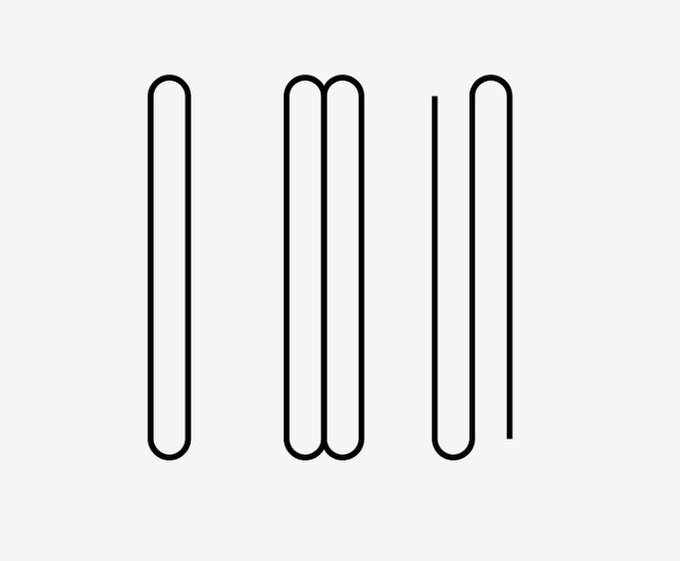
To create the neons use the Rounded Rectangle Tool. Start with a 100% rounded rectangle, then duplicate it and move it so you have one next ot the other. After that with the Direct Selection Tool (A) delete the rounded of the top of one of the rectangles and the bottom of the other. Use the image below for reference.

Step 3

Create the rest of the letters. Look at the B, D, and O. To create those letters you will basically repeat the previous step however with some different tweaks to make them fit in the character you are working on.

Step 4

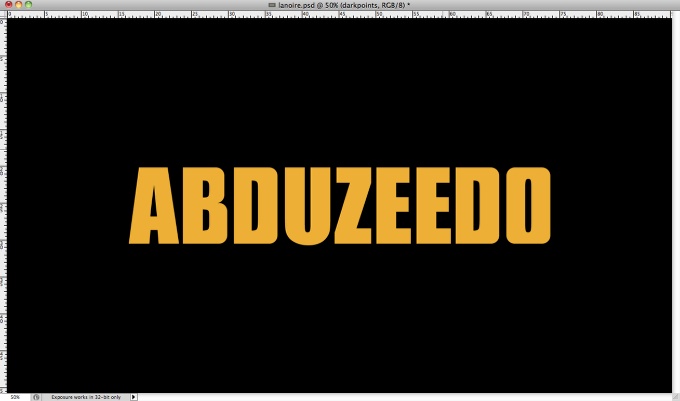
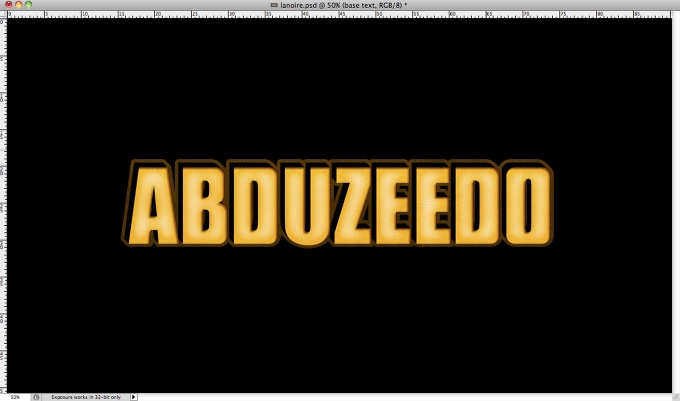
Open Photoshop and create a new document. I am using 2560x1440 for the size. Fill the background with black and then copy the ABDUZEEDO work from Illustrator and paste it in Photoshop. I am using yellow (#f0af17) for the color.


Step 5

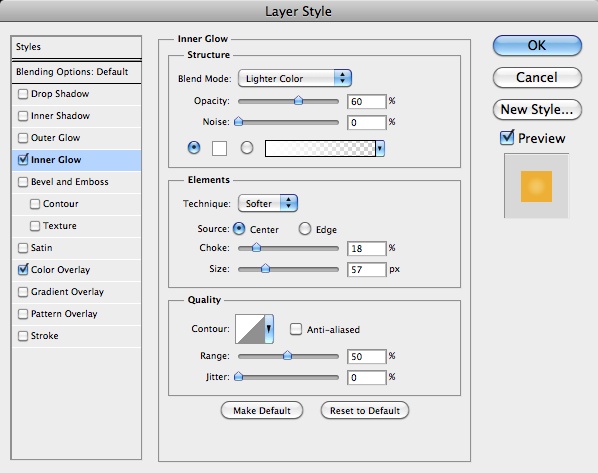
Go to Layer>Layer Styles>Inner Glow. Use Lighter Color for the Blend Mode, 60% for the Opacity, Center for the Source, 20% for the Choke and 60 pixels for the Size.

Step 6

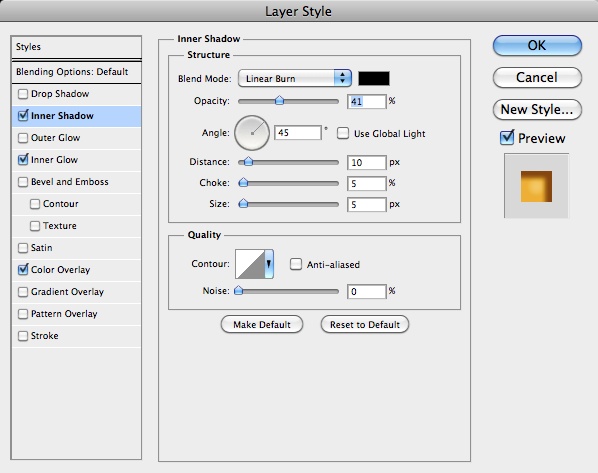
Select Inner Shadow. Use black for the color, Linear Burn for the Blend Mode, 40% for the Opacity, 45º for the Angle, 10 pixels for the Distance, 5% for the Choke and 5 pixels for the Size.

Step 7

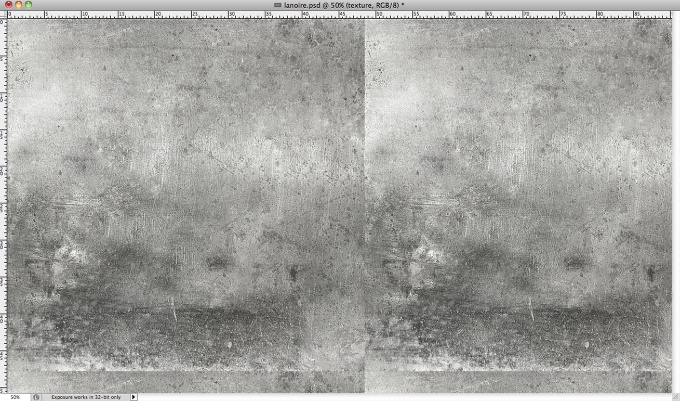
Now let's use some texture to give more realism. The one I am using is courtesy of Shutterstock and you can find it athttp://www.shutterstock.com/pic-20761540/stock-photo-metal-plate-background-texture.html

Step 8

Change the texture Blend Mode to Overlay at 30% Opacity.

Step 9

Duplicate the text and fill the layer with black, after that start duplicating and moving 2 pixels up and left. Repeat that a few times to create a sort of 3D extrusion. After that select all layers you created for that effect and merge them into one (Layer>Merge Layers).
Select the layer and go to Layer>Layer Styles>Stroke. Use 14 pixels for the Size, 40% Opacity and (#b47200) for the color.
Step 10
Copy the neon objects from Illustrator and paste it in Photoshop. Then go to Layer>Layers Styles>Blending Options. Change the Fill Opacity to 0%.

Step 11

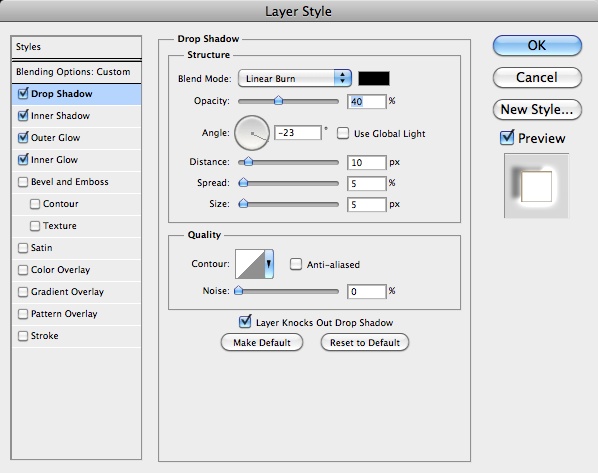
Select Drop Shadow. Use black for the color, Linear Burn for the Blend Mode, 40% for the Opacity, -23% for the Distance, 5% for the Spread, 5 pixels for the Size.

Step 12

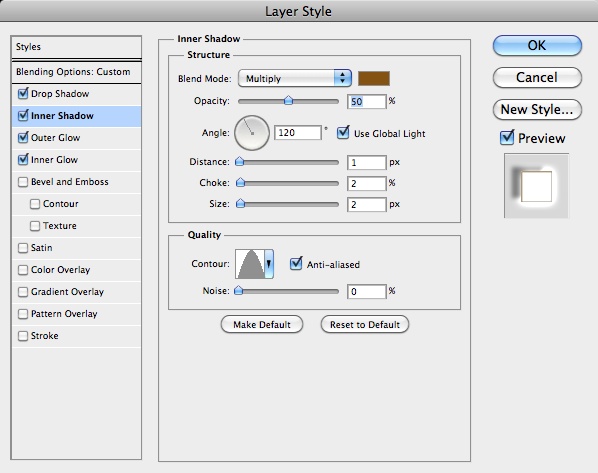
Select Inner Shadow. Use Multiply for the Blend Mode, #865200 for the Color, 50% for the Opacity, 120º for the Angle, 1 pixel for the Distance, 2% for the 

Step 13

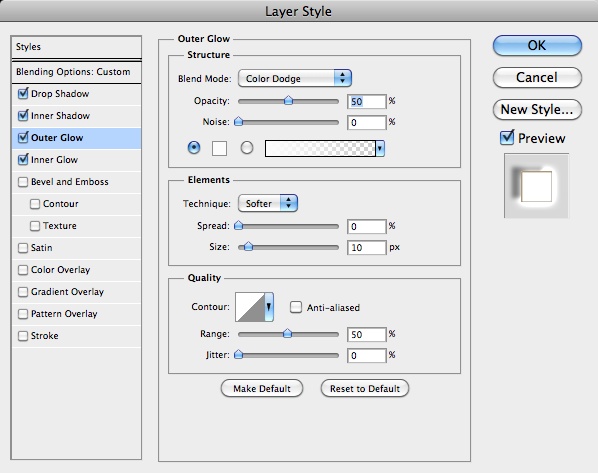
Select Outer Glow. For the Blend Mode use Color Dodge at 50% Opacity and white for the Color. Also change the Spread to 0 and the Size to 10 pixels.Choke, 2 pixels for the Size and for the Contour use the same I used in the image below.

Step 14

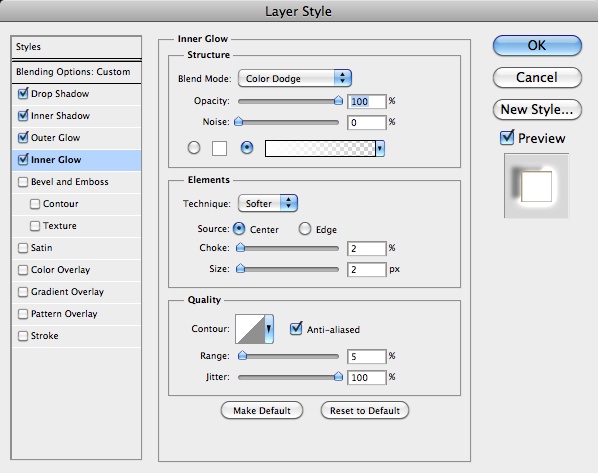
Select Inner Glow. Then use Color Dodge for the Blend Mode at 100% Opacity. Also change the Source to Center, Choke to 2%, Size to 2 pixels, Range to 5% and Jitter to 100%.

Step 15

Now let's do the same but this time to create some dark spots. So add a new folder but this time change theBlend Mode to Linear Burn at 80%. Then add the layer inside the folder and with the Brush Tool (B) and a soft brush with black for the color paint some dark areas. Use the image below for reference.

Done..you have completed the tutorial :)