
The Final Result:


Final result:
Resources:
Step 1:
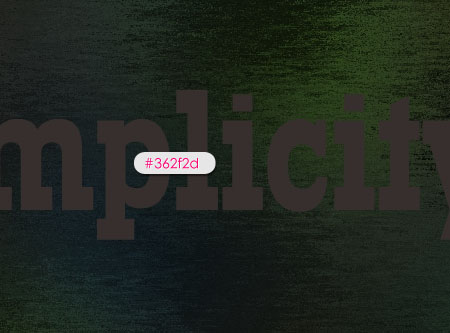
Fill the Background with the color #363636, then type the text you want, I’m using the font “Rockwell Condensed”, size (200 px), and the color #362f2d.
Fill the Background with the color #363636, then type the text you want, I’m using the font “Rockwell Condensed”, size (200 px), and the color #362f2d.
Step 2:
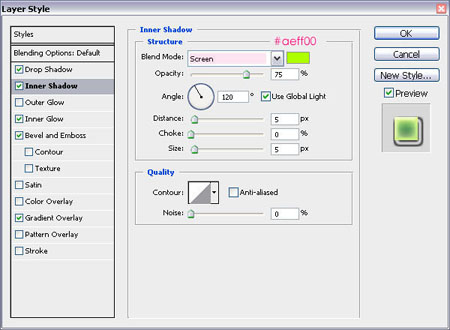
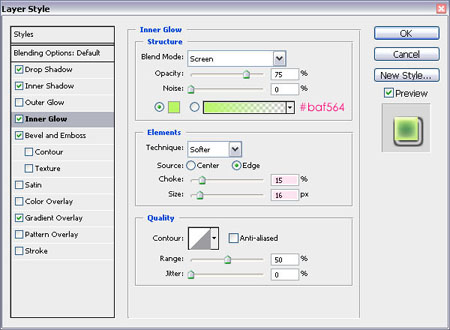
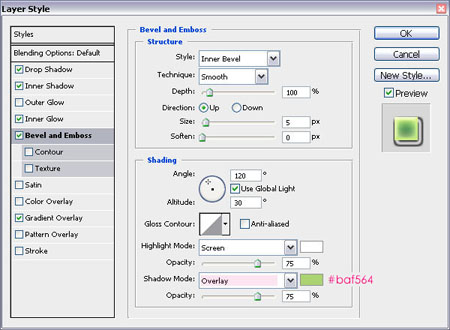
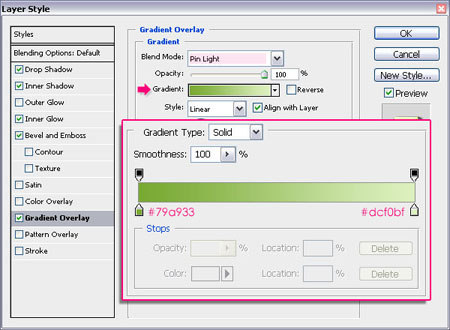
Double click on the “Simplicity” text layer, and fill in the values for the following effects:
Double click on the “Simplicity” text layer, and fill in the values for the following effects:
- Apply a “Drop Shadow” with a “Spread” value of (5) and a “Size” of (6). Change the “Contour” type to “Cone – Inverted”.
- For the “Inner Shadow”, change the “Blend Mode” to “Screen”, and the color to #aeff00.
- Apply the “Inner Glow” Effect using the color #baf564, and change the “Choke” value to (15), and the “Size” to (16).
- Add “Bevel and Emboss”, change the “Shadow Mode” to “Overlay”, and the color to #acd373.
- And finally, add a “Gradient Overlay”, using the Palette provided in the Resources section at the beginning of this tutorial, or simply create the gradient using the colors #79a933 and #dcf0bf.
Click “OK” to go back to your layer.
Step 3:
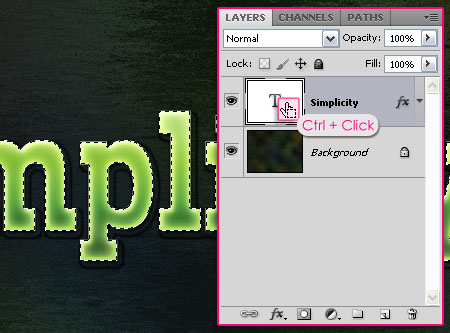
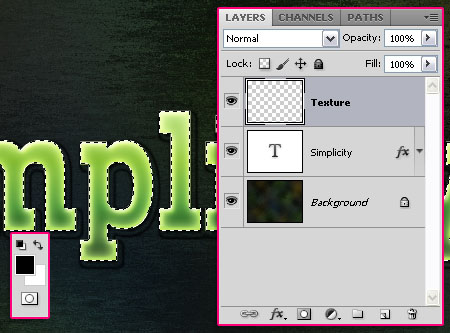
Press the Ctrl key, and click on the “Simplicity” text layer icon to create a selection. Create a new layer ABOVE the text layer and call it “simplicity-2″.
Press the Ctrl key, and click on the “Simplicity” text layer icon to create a selection. Create a new layer ABOVE the text layer and call it “simplicity-2″.
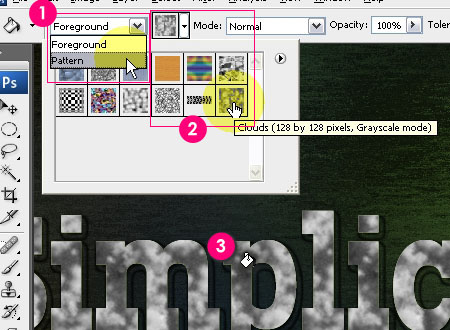
Step 4:
Select the “Paint Bucket Tool”, and change the fill type to “Pattern”. Choose the “Clouds” pattern, and fill the selection (make sure you are on layer “simplicity-2″).
Select the “Paint Bucket Tool”, and change the fill type to “Pattern”. Choose the “Clouds” pattern, and fill the selection (make sure you are on layer “simplicity-2″).
Step 5:
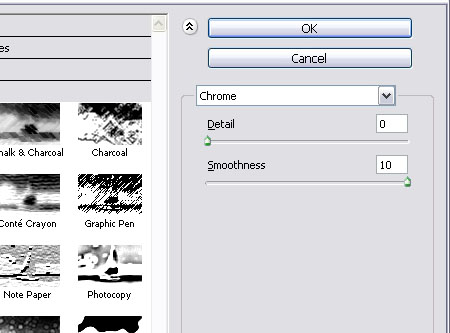
Go to the “Filter” menu -> Sketch -> Chrome. Type (0) for “Detail” value, and (10) for “Smoothness” value.
Step 6:
Again, go to the “Filter” menu -> Sketch -> Halftone Pattern. Type (1) for the “Size” value, (5) for “Contrast”, and make sure the “Pattern Type” is “Dot”.
Again, go to the “Filter” menu -> Sketch -> Halftone Pattern. Type (1) for the “Size” value, (5) for “Contrast”, and make sure the “Pattern Type” is “Dot”.
Step 7:
Finally, change the “simplicity-2″ layer “Blend Mode” to “Overlay”, and the “Opacity” to (45%), or whatever you think looks good.
Finally, change the “simplicity-2″ layer “Blend Mode” to “Overlay”, and the “Opacity” to (45%), or whatever you think looks good.
DoNe!!!!!!
Final result:


0 comments:
Post a Comment